

I was working on this laptee for a t-shirt and cloth diaper set that I’m sewing for a swap and thought I’d try out this idea that’s been running around in my head for awhile. A lot of ready-to-wear clothing has detailing like this around the neckline and sleeves. They use a special machine to do it, but I was sure that you could do something similar just using a run-of-the-mill serger. As it turns out, it’s really simple. I did take some pictures as I went along, though, so I could share with you how I did it.
I loved the result when the laptee was finished so I just had to try it out on a Charlie Tee. The pattern’s namesake is growing so fast, and he needed a couple of new longsleeve tees added to his wardrobe anyway. Aren’t they cool?
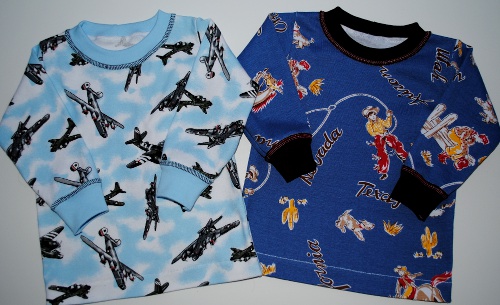
Just so you know, this serging method does leave a visible overlap at the back of the neck. If that little bit of messiness bugs you, you might want to just stick to using it for laptees or other patterns that don’t use a full loop of trim.
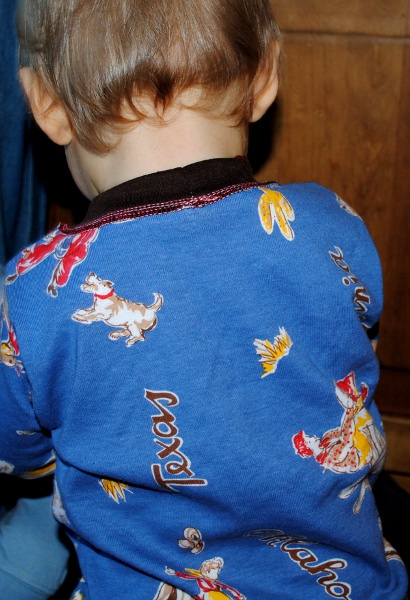
Honestly, though, once you put the tee on someone as cute as this? Would anyone even notice that tiny little imperfection? (And, just in case you wondered, I went hunting through my kids’ drawers and discovered that the clothing that has detailing similar to this almost always has an overlap at the back or on the bottom . . . and I’d never noticed it until I went hunting for it.)


Ready to try it out? Here’s my quick tutorial: Serger Detailing. Let me know if you have any questions!

Very, very nice tutorial. I sort of know how to do this, but you have it detailed so nicely. Thank you.
You sent me a raglan shirt in a swap once and I always admired your serging and details on it. I Actually thought you did that with a cover stitch machine.
Now I know your secret, watch me make my shirts look nice now. Thanks for the tut! Very nicely put together.
Michelle
truckermomma from dsd
OOOOOOOOOOOOOOOOO. I wonder if my old and very cranky serger will do it???
That’s a cool idea. I’m always looking for ways to add variety to the T’s I make for my kids, especially when doing the same pattern a few times. I wouldn’t have thought of that! Thanks!
I looove that airplane fabric, where did you find it?
Katie, I’ve had it in my stash for awhile. It’s a great super-soft ribbed knit. I just found it at The Fabric Fairy, but it looks like it’s a special order fabric: http://www.thefabricfairy.com/index.php/retail/vintage-bomber-plane-cotton-knit-fabric.html. You might try sending an email to see if they plan to stock it in the store soon. Bonnie
Katie, at The Fabric Fairy, I believe they will order that fabric for you if you order at least 5 yards. If you don’t want that much, if you ask them to, they will email you when someone places a large order for the fabric. I had them do that for me once w/ a certain print.
Bonnie, I just tried this today w/ a couple long sleeve infant gowns, they turned out really nice. When I take some pictures I’ll message you with them.
Hi, I just came across your tutorial and love how informative it is. I do have a quick question. I recently did this same thing to Valentine’s Days shirts that I made for my sons. It was near impossible to get the shirts over their heads due to the stitching not stretching. Do you have any problems with and what would you recommend to fix it?
Thanks so much!
I was hoping to find detailed pictures and descriptions of how to make a shirt for my one year old–this is perfect! Thank you for sharing.