There are still 12 days left to grab the free Mud Puddle Splashers pattern and sew a pair of shorts for the Hopeful Threads’ Little Boys’ Shorts Sewing Project! I thought I’d take advantage of naptime at my house yesterday to show you the quickest way to sew the MPS using knit fabrics.
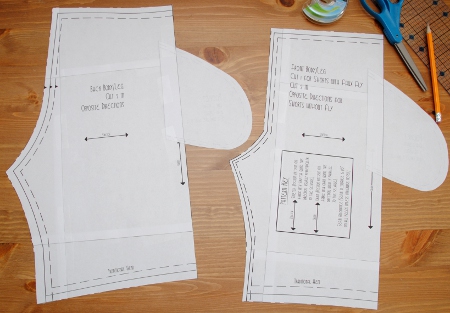
First, knit fabrics are wider than woven fabrics, so you can save a little time by combining the pocket and the body/leg piece. (You can do this on woven fabrics, too, but keep in mind that it will increase the amount of fabric that you’ll need, especially if you need to match up a stripe or print.) Tape your pattern together and cut out the correct size. Print and cut a second pocket pattern. (It’s page 26 of the pdf.)
 On the back on each pocket piece, measure in and draw a straight line 1″ in from the straight edge.
 On both the front body/leg piece and the back body/leg piece, measure and make a mark 3″ below the waist on the straight side.
 Place each pocket piece on the straight edge of a body/leg piece, overlapping so that the line you drew on the pocket is even with the straight side of the body/leg and the top of the overlap is at the 3″ marking. Tape the pockets in place.

Now you have two pattern pieces where before you had four.

Alright, we’re ready to get started on these shorts. It’s 1:00 here, and all is quiet as naptime has commenced.

Check to make sure the little ones are sleeping peacefully.


Cut out your shorts pieces. You’ll have two fronts cut in opposite directions and two backs cut in opposite directions.

We’re moving right along.

Except for the hem and the elastic channel, I’m using just my serger since these are knit shorts. You can use your sewing machine with a walking foot just as easily, though. The front and back rise are serged up now, and I’ve created my memory crease along the waist. A little spray starch will help when pressing cotton or cotton blend jerseys that like to roll. Sides are pinned together and ready to be serged.

Less than 30 minutes since we started!

That 90 degree angle where the bottom of the pocket connects to the side of the pants can be a little tricky if you’re using your serger. I serge both sides from the bottom up.

When I get to that angle, I simply pull the fabric slightly so that the angle sort of disappears. If you go slowly, you should be able to make that turn without a problem.

If a few of the loops end up off of the fabric, don’t worry, as long as both of the needle stitches are on the fabric. It’ll hold just fine and won’t be noticeable unless someone turns the shorts inside out and looks really closely. With a little practice, you’ll soon be turning that corner beautifully without even thinking about it.

1:42, even with taking a little time to snap a few pictures while I was working.

I’ve hemmed the legs and pinned the inseam. I hemmed these shorts by serging off 1/4″, then folding up 1″ and hemming using the triple-stretch stitch on my sewing machine. You can find a tutorial on how I do that right here: Hemming Knits.

Two minutes to two . . . not going to finish in under an hour, but I’m almost done.

Ready for the elastic.

Before I put the elastic in, though, I’m going to rotate the side around a bit and press those pockets in nicely.

Elastic and tag are in and the shorts are done!

And, I still have time to get a few other chores done, or, better yet, to enjoy an afternoon cup of coffee and a little mama-time on Pinterest!

Hey, there are still a dozen naptimes left in the month! Plenty of time to add to the ever-increasing pile of shorts for Children in Families in Cambodia! I heard that the number has already reached 100! Do you think we can double that number in 12 days?


It’s so nice to have these great, simple tips from an experienced seamstress on ways to have a quality bit of clothing come about a bit faster. And, I love being able to transfer your tutorial ideas to other projects to kick them up a notch, thanks!